

I’ve always been one of those people that saves everything and anything that remotely resembles an art or craft supply for the possibility of it being used in a future project. Some of these poor, neglected materials sometimes sit around for ages waiting for their shining moment and today, thank the stars, the “Creative Bug” strikes again!!!
What will we be doing, you ask?? We are going to control the chaos that hoarding saving all these things has created! And, if you are anything like me, you will most likely already have everything you need just laying around on one of the countless piles covering every surface in your flat.
The idea today is simple; we’ll be transforming a plain ol’ boring shoebox (or something similar) into a fancy-pants faux-leather storage container. If you recently bought yourself a brand-spanking-new pair of vegan leather shoes and saved the box then you’re in luck. No box? No worries! Choose something here and get cracking.
Aside from that, you’ll need paper grocery bags, glue, paint, and a couple of brushes (both to apply the glue and for the paint). That’s it, can't get any easier than that!!
In part two we'll decorate our box even further and we'll explore other materials but for now, let's get started!
Materials


Instructions
Step 1 - Gather all your materials and select the box you want to use.
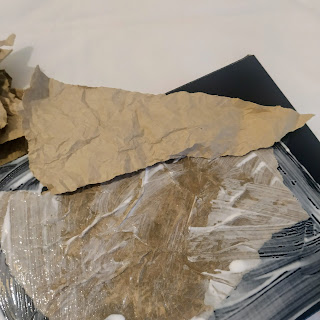
Step 2 - Tear your paper bags in large-ish but manageable pieces. IMPORTANT: Make sure you don't have any straight edges left!


Step 3 - Crumple all your pieces of paper into little balls and open them back up. You want lots of creases and wrinkles so repeat this process as many times as you want until you're happy with the result; I did it twice.


Step 4 - Now comes the fun part! Apply some glue to your box, a section at a time, and adhere the paper to it. Be sure to overlap the pieces a little so every inch of your box gets covered. If you find it hard to spread the glue, you can add a little bit of water to make it runnier. IMPORTANT: Don't overdo it or it will take forever for it to dry!


Step 5 - Once the glue has dried it's time to paint. Thin down your paint with some water and apply it to your box, again, work in sections. Use your rag or paper towel to dab the excess and build up the colour until you get the desired effect. You can do this with a single colour of paint or, if you have more, alternate your paints to achieve a more distressed, worn out look. PRO TIP: If you find that the paint is drying too fast and you can't remove it easily, sprinkle some water on your paper before applying the paint.


